Some time ago, I checked out the Melitta Caffeo Solo, it was great and was actually my daily driver for well over a year. Melitta has now sent over their Latte Select, a newer Bean to Cup machine with a noticeable upgrade from the Solo or at least it looks that way from the features. I’ve been using it over the last couple of weeks as my go-to machine, there is quite a lot to try and get through but I’ll try and be as efficient as I can.
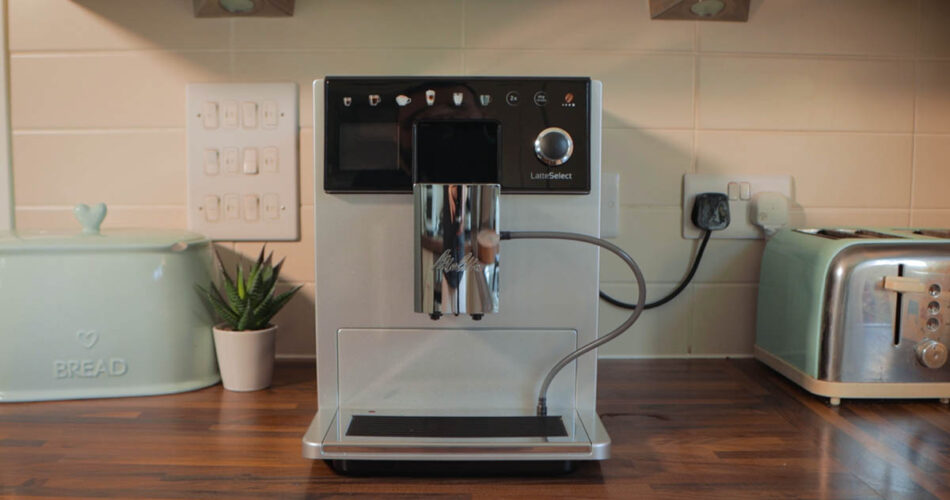
Out of the box, it’s quite a large machine with a size of 255 wide by 340 high and 470mm deep, so it will take up a bit of space on your kitchen counter. On the front and working top to bottom various touch buttons for default coffees, hot milk, hot water, profiles and coffee strengths. Below that, a small coloured screen to the left and to the right, a rotary push button which is used for browsing the settings. Centrally, the adjustable outlet for the coffee, water and milk, although the milk is plugged in via the side from a plastic tube that goes into the external milk jug. Below that is the drip tray which holds used water and coffee grounds. To the very top, a cup rest with metal grating and behind that, the bean hopper. To the left, is a removable 1L water tank. The right-hand side offers access to the removable brewing unit, to the left the power on button. Although quite large compared to what I’ve tried before, it looks good and it feels premium.
Features appear plentiful.
It’s bean to cup, so no portafilter, no fuss, just fill up and press a button. It’s got a small display plus touch control buttons for some default coffee types. There are 12 different recipes available, there is a two bean hopper, an anti-scratch tray but we’ll see. A separate milk jug for easy milky coffees, you can change the strength, adjust grind course, create your own profiles, there is a double cup mode and a bunch of other stuff too. Spec-wise, max power consumption is 1.4kw and max pressure is 15bar.


Set up was very straightforward, unbox, unwrap and plugin. Upon first boot up, you need to set the time and language, then test the water for hardness (test stick provided), tell the machine the result, which will determine how often you need to clean it then fill up the water tank. Fill the hopper with beans and then make two drinks, but throw them both away, as we’re just flushing the system. What are the options if you have hard water, use it, keep on top of cleaning the machine to reduce limescale. Purchase a filter to use within the machine, which Melitta sell separately. Or use filtered or bottled water.
Using the milk container is pretty easy, it’s just a plastic container with a lid and built-in removable straw that goes to the bottom of it. The container is plugged into the side of the main outlet on the machine via a plastic tube. The machine sucks the milk up, heats, froths and pours it out into your cup. There is a neat cleaning feature for the milk, it sucks out the milk in the tube and cleans, so you can unplug the tube and put the container in the fridge to keep the milk fresh.
The first time making a coffee, turn the machine on, let it heat up, let it flush through some water and then it’ll be ready to go. I just went straight in for a cappuccino and pressed the cappuccino button. It pops up on the screen the recipe, it was something like 40grams espresso, 80grams of milk. Oh, how small that was. I used my standard mug and it barely filled it up halfway. Tasty but unfulfilling. To get a properly sized cappuccino or any other drink for that matter, you have to turn the knob, it’ll display the overall millimetres for the drink, so you can make it bigger or smaller. However, with that, unless you know the size of your mug, you’re guessing. That’s fine, it’s all about trial and error with coffee machines. Alternatively, you can press the cappuccino button and then rotate the knob. This does the same thing but instead of an overall millimetre for the drink, it splits it up between espresso and milk. So I knew the first time was half the size of my mug, so I rotated the knob to double the previous figures, ish. That then gave me a good size cup of coffee.
The coffee itself was well extracted, the espresso was smooth, rich and when I swirled it, it had a nice crema to it. Milky drinks like a cappuccino, are also very tasty, a good 2/3 to 1 ratio of coffee to milk that was fine for me. I tried all the drinks and most of the time I had to adjust the recipe and/or quantities to make a cup I really liked. Noise wise, it’s relatively quiet. My kids sometimes complain when I use my other machine and steam milk but they had no complaints with the Latte Select. I took a few temperatures, I know some people like their coffee really hot. Espresso comes out about 70C on normal temp setting but up that to hot and your shot will come out closer to 78C. Cappuccino at 70 C, hot milk comes out at about 66 C, hot water comes out at 82C. Normal and hot temperatures? I’ll get onto that. It’s worth noting the milk comes out with a bit of froth to it, so it looks good, the texture is quite nice when you drink it but it’s too airy to try any latte art, if you tried to put milk into a jug and add the milk to your espresso yourself, it won’t work, it’s not designed too so don’t bother trying.


There is a whole software, control settings option you can go through. Hold the rotary button in for a few seconds and the menu will appear on the screen. Then use the rotary knob to navigate the menus up and down, press to enter. Options include direct keys, or the touch buttons, the default settings as mentioned earlier. Within the direct keys option, you can select a coffee amount in grams, coffee strength as mild, normal, strong, extra strong, and temperature, low medium or high. This applies to the majority of the drinks available. Moving on to the recipes function, that opens up your options in terms of types of coffees, americano, flat white etc, also all of them can be adjusted. My coffee is your user profile, which basically you mod all your coffees how you want, save them under a name and then they are stored for you to use another time. How often you’d use that, I don’t know, it depends on how many people you have in your home I guess. Care option, rinsing, cleaning the milk, filter and descaling, both settings and the ability to start the cleaning process if desired before being prompted, although the machine will prompt you when it needs cleaning. Lastly, general settings, change the time, date, auto-off feature etc.
Back to those quick buttons and moving along to button number 7, which is the two beverages option. Put two cups under the outlet and two drinks will be made simultaneously. This isn’t limited to just espresso, the milk will also come out twice to make two lattes. You need to press the x2 button first and then follow up with your chosen drink. When making two cappuccinos, it did two shots of coffee, so one effectively one per cup, then pushed milk out to both cups as well. Remember to adjust the quantity of coffee before pressing go. You’ll also see from the two pretty standard cups I used, the outlet is very close to the side of a cup and I did miss a bit of coffee at first until I relocated.


There is an option to change the grind setting, although the machine has been optimally set at the factory before it comes to you. So fear not if you see coffee grounds in your machine when you first unbox, it’s been tested and used at the factory and if you go into settings, it displays how many drinks have been made and I think it was about 10 before I made my first. If you do want to change the grind fineness/coarseness, there is a slider at the rear of the machine allowing you to do so.
The hopper includes a manual lever that allows you to swap between two types of coffee beans. It’s crude, I found the beans to mix so I personally would not put two types of beans into the hopper but the feature is there if you wanted it. There is also a flap next to the hopper, you can put in already ground coffee if desired. The machine knows you’ve opened the chute and you’ve got 3 minutes to use those grounds before the machine goes back to wanting to grind beans.
As for cleaning the machine, on the outside, it can all be whipped down. The tray can also be removed and washed in the sink, the grounds thrown away or used in your garden as fertiliser. Then the next part is descaling and cleaning the internals. You can purchase descaling tablets from Melitta or elsewhere and went prompted by the machine to clean, you can pop a tablet into the water tank and flush it through. It takes about 15 minutes, it tells you what to do and it’s very easy. Also, remove the brewing unit from the right-hand side of the machine and clean that, as it will have all sorts of coffee grounds and residue on it.
Overall, a good looking, easy to use and very versatile bean to cup coffee machine. Negatives, not really. There is a bit of a learning curve with getting the right settings and quantity to get the cup of coffee you want but once that’s defined, it’s easy sailing. If you’ve used a Melitta coffee machine before, such as the Solo, it’s the same brewing unit or at least it looks it to me, so you may be paying the extra money for the functionality, the brains rather than the coffee press and extraction. Melitta has this listed with a retail price of £1000GBP which seems a tad high to me. That being said, after a quick Google search, retailers are selling this for around £650GBP brand new, which is a much fairer price and more competitive too in my mind.
For info and to purchase, head over to the official Melitta website.
If you’re interested in espresso machines, here is a comparison review of two espresso machines, namely the Calphalon Temp IQ and the Delonghi La Specialista