
We use action cams a fair bit now, they’re incredibly portable and offer a quality recording when we don’t want to take all our heavy gear with us. Not to mention they’re great for a variety of sports or activities and a must-have when travelling. However, the market is flooded, with the very best from Go Pro and DJI, and the worst which you can pick up from your local petrol station for £9.99. Somewhere in between sits some “budget” cams trying to take on the big brands and doing a pretty good job at it. One of those is the Akaso V50 Pro.
Tech Spec
- £119.99 rrp
- Upto 4K / 30fps
- 20MP still image
- Various viewing angles upto 170degree
- 2” IPS touch screen
- Electronic image stabilisation at all resolutions
- Internal filter effects such as dive mode, which filters red light
- Waterproof upto 30m with casing
- Wireless remote control
Unboxing
The cam comes boxed just like a Go Pro, with that 360deg clear plastic casing, with a cardboard box underneath. The amount of accessories provided with this cam, hands down beats the big brands. You get the cam, 2x 1100mAh batteries plus a charger that will charge both simultaneously, a waterproof case, remote control, USB cable, instructions and then a handful of different attachments for holding or attaching the camera to various things. The attachments are a great start but do not include things like a head or chest mount, grip or selfie stick.
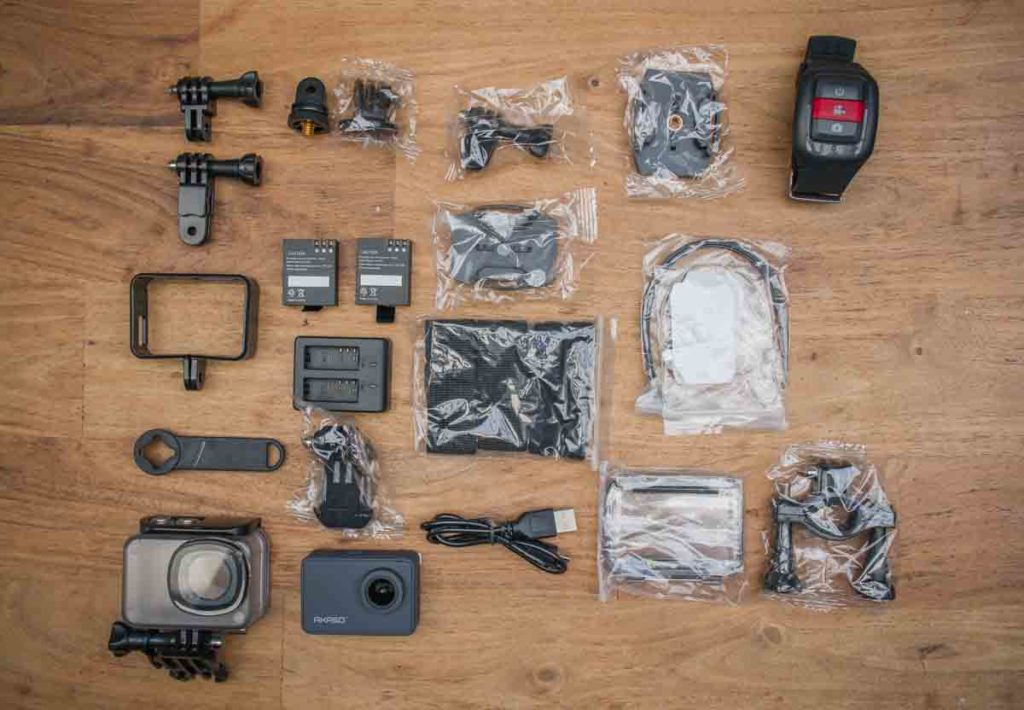
The cam itself is the typical shape, size and appearance you would expect from an action cam. A grey rubber exterior, a lens at the front and a large “2 touch screen at the rear. To the top of the cam are two buttons, used to turn it on/off, mode selection and triggering record, plus the inbuilt microphone. To one side are the ports, mini USB, micro SD card slot (up to 64gb) and micro HDMI. The other side has a small speaker and the bottom has your standard 3/4” tripod hole and a cover to access the battery.
Set Up & Use
There is no real set up required, just insert one or both batteries into the charging dock and charge them at the main via the provided USB cable. Once charged, insert one into the cam, along with your micro SD card and turn it on.
The display is large, it’s bright, it’s vibrant and its touch screen. The screen as default displays a number of things, such as battery life, mode selected, video resolution etc. As mentioned before, the buttons on the top turn the cam on and allow you to select modes, being video, image, playback or settings, while the screen allows you to control everything else. Two main buttons areas on the touch screen are to the right and at the bottom. Touch the bottom button to gain access to shortcuts, such as WiFi, remote or sound settings. Touch the button on the right-hand side, this will display the four modes, which you can click on to select. The easiest way of navigating through the settings is via the touch screen.


There are plenty of settings to go through to fine-tune the cam to best suit your environment. The settings include but are not limited to, video resolution of 4K/30FPS, down to 720p 120FPS (image stabilisation won’t work with 120P). Videos can be recorded in H.264 or 265 codec. You can turn image stabilisation on or off, but I recommend it’s always on. You can limit the length of video recording if desired, you can set up a time-lapse and you can set up slow or fast motion videos. You can also activate wind noise reduction, adjust low light settings, date and times and select scenes (manual, water, riding, winter, diving and night).
The above was just the video settings, there are a variety of image settings too such as resolution, 20MP down to 2MP, burst modes, picture quality and long exposure. You can break the settings down even further with the effects or scenes, including adjusting AE metering, set colour filters like sepia, vivid etc, adjust white balance, exposure value and ISO.
Then there are the general settings, like turning the beeps off, changing the angles from super wider to narrow, WiFi settings, remote control settings, auto power off, quicker record and one of the most important, format card, which should be the first thing you do.
Performance
The video quality was as expected and although I’ll discuss it in words, nothing beats seeing some sample footage, so check that out. The image is clear, it’s fairly crisp but it is a little dull and the colours don’t pop out at you. The best footage was seen outside in daylight or in a very bright space. Quality in low light drops and there is some noise in the image. The variety of resolutions are good, I generally stuck to 4K 30FPS but did try the slow-mo at 720p and it was fun. The electronic image stabilisation works at all resolutions apart from 720p which is good but this is just electronic stabilisation and the tech inside isn’t as good as the leading brands, so it helps but it’s not fantastic. The difference in angles is clear and it’s good to have the option. Super wide records everything around you, although you do get that fish eye effect, while medium offers more of a traditional recording image, better for holiday videos or vlogging.
Taking a still image with an action cam is not something I do often, it’s not the reason you get an action cam but I took a few pictures and they were more than enough for social media. I did delve into the manual settings, which was fun and does allow you to adjust settings based on your environment if so desired.
Audio quality is ok, it’ll pick up conversations very well and was better than expected. There is also an option to plug an external microphone in too via the USB port, which is a nice touch. However, when you put the waterproof case on, the quality in audio drops dramatically. This is no fault of theirs, this has happened with every cam I’ve used that requires a casing. It’s a downfall of the cheaper action cams.


As for using the cam, it’s was very easy. The buttons work well, in or out the case and obviously the touch screen does not work while in the case. Out of the case the touch screen was ok, it is quite small so it can be tricky to hit certain buttons and it was a little laggy in areas (scrolling).
There is a free app you can download to view and save out your content, which works fine. It’s very easy to link the cam to your smartphone and although a little slow sometimes with the previewing, it was fine. The remote control, what an odd accessory. It’s a watch, you put it around your wrist and there are three buttons on it, power, video and photo and it will turn the cam on, start/stop recording or take a picture. It’s not the most flattering of watches but some may find a use for it.
Verdict
Considering what’s on offer, what’s included in the box, at just £120 I feel it’s a worthwhile purchase. The image quality is good, the functionality and options are good, the included attachments are good and they provide you with two batteries, fantastic. Can it compete with the big brands, for image quality and stabilisation, no but it does give it a good shot at a fraction of the price.
For more info, head over to the official Akaso V50 Pro webpage.