
Walking around CES this year, we saw many different things but one stood out, so much so that we took a video and put it on our socials. It was cool, it was fun, it was a drone flying effortlessly under a shower of water. At the time, we didn’t get a chance to stop and discuss further but I recently found out it was the PowerEgg X drone. They got in touch and offered to send one over to us to try out and the best part, it came with the waterproof housing we saw so we can test it in the rain.
The brand behind this drone, PowerVision, have been around for a few years now and started their product line up in 2016 with their PowerEgg drone. Now they have several products under their belts, that either fly, or swim underwater. Their latest drone is the PowerEgg X, it retails at 849euros or 1,140euros if you want the waterproof accessory kit. I’m excited to try this out, see what the footage is like, so let’s crack on.
Tech Spec
– Upto 4K 60FPS
– 1/2.8” CMOS sensor | 12MP | f/1.8 | Angle of view 78.4deg
– Photos as JPEG & RAW
– Videos as MP4 / MOV (H.265/H.264/MPEG-4 AVC)
– MicroSD Card upto 128GB
– 3800mAh battery (30 minutes flight time)
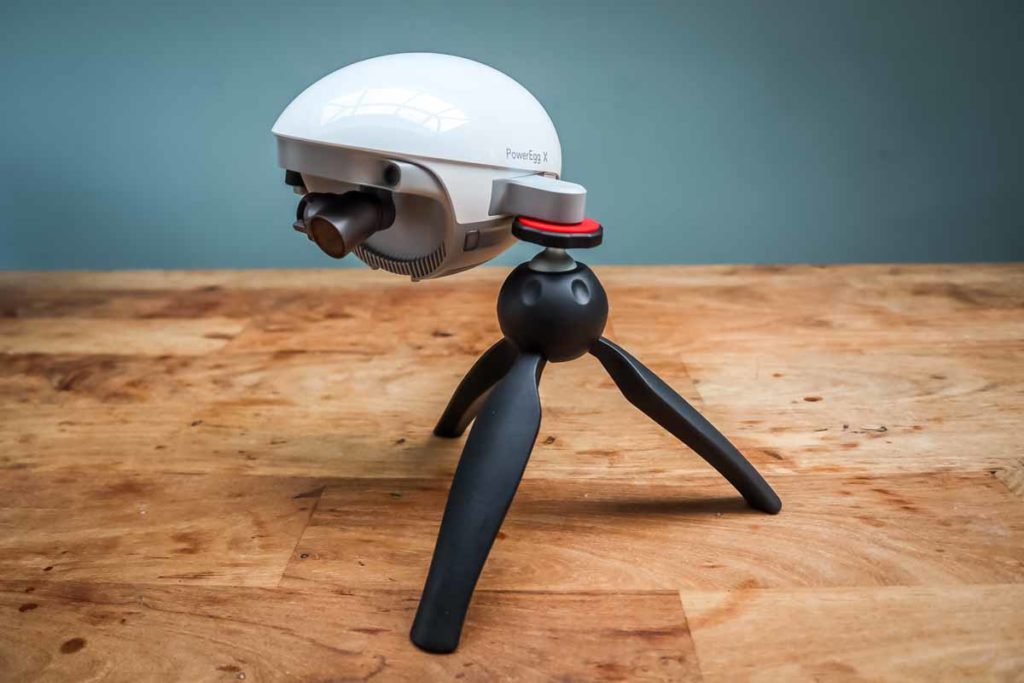
The PowerEgg X is just like your traditional drone but it also offers an alternative use, AI Camera Mode they’re calling it. In essence, it allows you to remove the propellers and use just the camera, as a stand along camera. There are two adapters, a grib and a tripod mount, allowing you to either set the camera up somewhere on a tripod to record, or walk with it.

First Impressions & Unboxing
The drone comes in it’s own carry case, within a cardboard box. The case is made from polystryne, it’s robust, it’s grey, it’s got a handle to make it easier to carry and it’s fully moulded, meaning each component fits securely in it’s specific place. Open the case up and it’s full with everything you need to get going, there is no need for any additional purchases, such as a controller, like some brands do. It includes the drone, both left & right arm propellers, 1x battery with associated power adapter (EU plug for us), a variety of USB cables, 1x controller, a wrist strap, tripod convertor, gimbal protector (already installed onto drone) and a variety of spares.
The camera part itself is egg shape, it’s glossy white and has a plastic casing. Remove the plastic cover on the underside and things begin to take shape. You will find the camera, on it’s gimbal to the front of the drone and also a variety of sensors to the underside. There is a single push button and four small lights to the top, which shows battery level and turns the device on. There are two small push buttons either side of the drone, push them in and then that top section where the button can be taken off. Below it is the battery, which easily pulls out, which then gives you access to the microSD card slot too. Either side of the battery is where you attach either the propeller arms, tripod mount or wrist strap. It’s very easy to attach them and they all clip in the same way.
The remote control is plastic too and follows that gloss white & grey colour scheme. It’s lightweight, it’s got an internal rechargeable battery which is good, it can hold your smartphone securely and it feels good to hold. It somewhat resembles an Xbox controller, or it does to me anyway and I like it.


The overall build quality of the drone is fantastic and oozes quality. How robust is it? Time will tell and seeing the camera on the gimbal just wobble, does concern me slightly with how durable that will be but, there is a guard for the gimbal, so keep that in place when not capturing footage or in storage.
Set up was a little frustrating and took alot longer than I thought it would. I attempted to connect my iPhone to it via the Vision+2 app (free) and trying to connect my phone to the drone, via WiFi didnt work that well. Stef was with me, so he attempted to try it via his Android phone and he had more success. Once the two were connected, there were 2 or 3 firmware updates required before allowing access to the drone. They were not large, 130mb was the biggest I think but it took some time to download, install and reset. Once all the firmware was up to date, we gained access to the drone.
Once connected, we went outside and begun initiating flight mode. For this, you need to connect your smartphone to the controller via one of the provided short USB cables and follow the instructions. I have to say, once the initial activation/set up was complete, it was a breeze to reconnect and get going.


Time for our first fight…
The drone is so easy to fly, it almost flies itself. On first flight, the app prompts you to go through a brief tutorial, which gives you the basics and then the manual & quick start guide takes it further. Only a paper copy of the quick guide is provided, it’s somewhat limited and it didnt answer all our questions when setting up, so I highly recommend you visit the PowerVision website and check out the manual. Along with the tutorial, you will receive a warning if you are near a no fly zone, which we were…
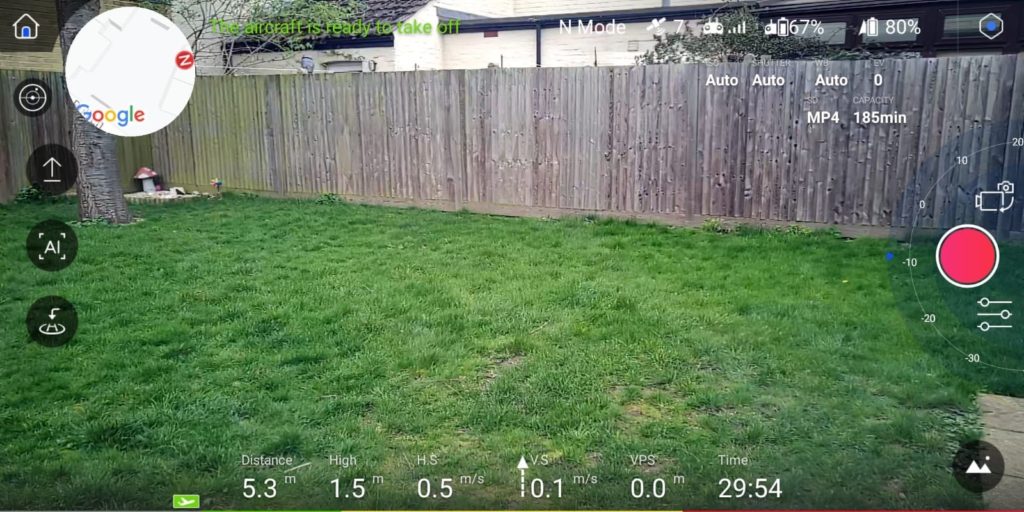
The entire display mirrors what the camera is seeing, plus controls on the outer edges, which are clear and easy to navigate. Key buttons are located on screen and include automatic take off & landing, automatic return to home, stop/start record or take a photo and then all the necessary readings & figures are shown. These include battery levels for the controller and drone, signal strength, distance and heights, drone and wind speeds. The controller has a number of quick press buttons that you can trigger, so there is no need to take your hand off the controller to touch the display. These include things like start/stop recording, take an image but also drone mode, N for normal, E for easy mode and P for professional mode, which removes any limits and allows the drone to fly at its highest possible speeds.
Within the app, there are various settings and options you can adjust to suit. These include various modes, image settings such as ISO, EV, resolution and AI modes such as ‘follow me’, point of interest, QuickShots and time lapse.
The automatic take off is great, activate it and the drone will take off and hover on the spot indefinitely at 1.5m high. You can then use the joysticks to fly the drone up, down, forwards, backwards, left, right and rotation. Flight is very smooth, it’s actually quite quick and there is no obvious delay between controller and the drone. The drone does a very good job at holding it’s own against strong winds, with only a small reduction in speed when going head first into it.
There is also a return to home feature, which also worked very well, it was fairly accurate and landed within 1m of where it took off. As a safety feature, when you use the return to home feature, the drone will automatically fly high (10m) in the air and navigate to the home spot, to avoid anything in the way at low level. It’s worth noting the drone is restricted to 30 meters (ish) in flying height, 3.7 miles in distance and 30 minute battery life. If you hit the invisible wall of the no fly zone, controls will stop and you’ll need to turn around or land. Unknown to me, I am quite close to a small domestic airport, so in one direction, was limited by the no fly zone and I was impressed at how restrictive the drone became.
As for video quality, it’s pretty darn good. At it’s peak, it can record at 4K 60FPS, down to 720p 240FPS and a max bitrate of 75Mbps (lower than some competitors). At 4K60, you can get that crisp image, add some slow mo, a tad of colour grading and the end result is the thing of dreams. The video quality is on par with similar top tier drones, far superior than cheaper models but I would recommend colour grading, the colours were a little dull. The angle/direction of the camera can be adjusted via a scroll wheel on the controller, although it is limited. As for still images, the 12MP sensors does a decent job. The image is detailed, it’s crisp and more than adequate in most situations. One thing to remember, take the watermark feature off.
There are a number of AI options while the drone is in the air. The most interesting is the tracking option, where you can select yourself or another person, as the subject and then the drone will follow you from an angle or move around you while you walk. You do need at least 3m radius around for you this too work but it does work very well and quite fun to try out. The camera can also track camera gestures which does works but is not overly efficient. Hand up like a hi five is the follow command, peace sign with two fingers is take photo, OK sign will start group photos and thumbs up will start or stop video recording.
There are also ‘quickshots’, five default movement types, where the drone will move in various ways but still track you, offering a more cinematic look. Along with the AI tracking, there is also a SyncVoice technology included too, which can pick up voice commands from the smartphone connected to the drone and sync the audio & video together.
Most of the above options are available when in handheld mode. Take the propellers off, attach either the handheld or tripod attachment and then use the camera walking around or on your tripod. For me, set the camera up on a tripod and with the tracking AI, you can create some great content. Although the tracking is wide at around 180degrees, it is limited and if you go hard left/right/up/down, you will see the camera casing in the corners of the footage. Also, the tripod mount will only work with selfie sticks or those handheld tripods, it will not attach to a tripod head like a DSLR would because of the limited distance between 3/4″ tripod hole to the camera restricts it.
Lastly, if you go for the bigger bundle, the Wizard pack, not only will you receive another battery and some additional spare parts, but you’ll get the waterproof housing and water landing floats. The waterproof housing is fantastic, it’s very simple to clip in and keeps the egg safe from water, but the propellers remain outside. On the day of flying, it was dry but I set the drone to hover near me and I attacked it with my hose pipe. It held up perfectly. The only issue and it was expected, the water drops sometimes remained on the casing, lreducing visability for the camera. Some tracking features are not available with the casing on. As for the polystyrene floats, they can be strapped to the legs of the drone and allow you to land on flat water, if so desired.
Verdict
Thats alot of typing, I hope I’ve covered it all and my overall thoughts on this PowerEgg X are very positive. It may seem expensive but DJI’s offerings appear to be more expensive for similar features, unless you wanted lower image specs for a similar price. As I’m in the UK, I highly recommend the extra bundle, the second battery is a must anyway but the casing is also very good and means you are not restricted by the weather.
For more info and to purchase, head over to the offocial PowerVision website.